This is the ultimate guide to warrior pose 2.
We’ll dive into the meaning and benefits of the warrior pose 2, exploring how this foundational move serves as a masterclass in yoga for strength and balance.
Whether you call it the classic warrior pose 2 or by its traditional name, Virabhadrasana II, you’re about to discover why this stance is the secret weapon for a resilient body and a focused mind.
Let’s dive right in.
What Is Warrior Pose 2 Yoga? (Virabhadrasana II Explained)
To truly master the warrior 2 pose, it helps to understand that it isn’t just a physical shape—it’s an embodiment of a legendary narrative.
The Meaning and Sanskrit Origin
The name Virabhadrasana II (pronounced veer-ah-bah-drah-sah-nah) is derived from three Sanskrit words:
- Vira: Hero or warrior.
- Bhadra: Friend, auspicious, or blessed.
- Asana: Posture or seat.
While many yoga poses are named after animals or nature, the Warrior series is unique because it is named after a specific figure in Hindu mythology: Virabhadra.
The Myth: A Story of Fierce Focus
In yoga mythology, Virabhadra was a powerful warrior created by the god Shiva from a lock of his own hair.
Shiva, consumed by grief and fury after a personal tragedy, manifested Virabhadra to take a stand.
Warrior 2 represents a specific moment in this epic: The moment the warrior sights his target. When you hold this pose, you are channeling that same unwavering gaze (Drishti) and laser-like focus.
You aren’t just standing; you are preparing to move through life’s challenges with the precision of a hero.
What the Warrior Pose 2 Looks Like
Visually, Warrior 2 is a study in symmetry and expansive power.
Imagine a line of energy moving in four directions at once:
- The Foundation: Your feet are wide apart—about four feet—with the front heel aligned with the arch of the back foot. The front knee is bent at a 90-degree angle, stacked directly over the ankle.
- The Torso: Unlike Warrior 1, the hips and chest are turned to the side, opening up the front of the body.
- The Reach: Your arms are extended parallel to the floor, reaching out toward the front and back “horizons.”
- The Gaze: Your head is turned toward the front, with your eyes locked over the middle finger of your leading hand.
Tip: This expansive posture helps lower cortisol (the stress hormone) and increase testosterone (the hormone of confidence). By physically occupying more space, you subconsciously convince your brain that you are in control.
Step-by-Step: How to Do Warrior 2 Pose Correctly
Precision is the bridge between a simple stretch and a transformative practice.
To reap the benefits of Virabhadrasana II, alignment is everything.
When your skeleton is stacked correctly, your muscles can engage without strain, allowing your mind to find that “flow state” focus.
Follow this guide to build your warrior from the ground up.
The Warrior Pose 2 Yoga Step-by-Step Guide
Easily start with these steps.
- Start in Mountain Pose (Tadasana): Stand tall at the top of your mat. On an exhale, step or lightly jump your feet 3 to 4 feet apart.
- Set Your Feet: Turn your right foot out 90 degrees (pointing to the front of the mat) and pivot your left foot slightly inward (about 15 degrees). Align your front heel with the arch of your back foot.
- Find the Lunge: Inhale and reach your arms out to the sides, parallel to the floor. As you exhale, bend your right knee until it is directly over your ankle. Aim to get your thigh parallel to the floor.
- Engage the Core: Draw your navel toward your spine and tuck your tailbone slightly. Keep your torso centered—don’t lean forward over your front leg.
- The Gaze (Drishti): Turn your head to the right and look out over your middle finger. Soften your shoulders away from your ears.
- Hold and Breathe: Maintain the pose for 5 to 10 deep breaths, then repeat on the left side.
Alignment Tips & Common Mistakes
Even experienced yogis can fall into “autopilot.” Watch out for these common misalignments to protect your joints:
| Feature | Common Mistake | The Pro Correction |
| The Knee | Knee “collapsing” inward toward the big toe. | Press the knee toward the pinky toe to keep it aligned with the ankle. |
| The Torso | Leaning forward (reaching for the future). | Keep shoulders stacked directly over the hips. Stay in the “now.” |
| The Back Foot | Back leg goes “lazy” or foot lifts. | Press firmly into the outer edge of the back foot to engage the glute. |
| The Shoulders | Shrugging up toward the ears due to tension. | Drop the shoulder blades down the back; imagine your collarbones widening. |
Check your “Power Line”: If you were to draw a line from your front middle finger to your back middle finger, it should be perfectly level. If one arm is sagging, your brain perceives a loss of balance. Level your arms to level your mind.
Top Benefits of Warrior Pose 2 Yoga
Warrior 2 is far more than a physical exercise; it is a holistic recalibration.
While your muscles are firing to maintain the hold, your brain is busy processing a surge of sensory feedback that enhances your overall well-being.
By integrating the physical, mental, and emotional, this pose serves as a “full-system reset.”
Warrior 2 Pose Yoga Physical Benefits: Strength from the Earth Up
From a biomechanical perspective, Warrior 2 is a powerhouse move.
It targets multiple muscle groups simultaneously, building functional strength that translates to better posture in your daily life.
- Legs & Hips: This pose is an intense builder for the quadriceps and hamstrings. Simultaneously, the 90-degree turn of the hips provides a deep, active stretch for the adductors (inner thighs) and hip flexors.
- The Core: To keep your torso upright and centered, your obliques and transverse abdominis must engage. This creates “axial extension,” lengthening the spine and reducing lower back pressure.
- Shoulders & Arms: Holding the arms parallel to the floor develops isometric strength in the deltoids and triceps, while the broad chest opening counteracts the “slouch” caused by hours at a computer.
Mental Benefits: The Neurobiology of Confidence
In the world of psychology, Warrior 2 is a “high-power pose.” Taking up space physically has a direct impact on your chemical makeup.
- Laser-Like Focus: By utilizing a Drishti (focused gaze) over your front hand, you train your brain to filter out distractions. This mirrors the cognitive process of goal-setting and execution.
- Boosted Confidence: Research suggests that holding expansive postures can lower cortisol (the stress hormone) and increase feelings of self-assurance.
- Presence: The intense physical demand of the pose forces you out of “looping thoughts” about the past or future and anchors you firmly in the present moment.
Emotional & Spiritual Aspects: The Inner Warrior
For the dedicated practitioner, Warrior 2 is an exercise in Stira (steadiness) and Sukha (ease).
Spiritually, it represents the balance between fierce determination and calm surrender.
You are unyielding in your lower body, yet soft and open in your heart and breath.
It teaches you how to remain peaceful even when you are in a “fire” (the burning sensation in the thighs), a skill that is invaluable for navigating real-world emotional stress.
Ready to dive deeper into the mind-body connection? Check out our companion guide on the Benefits of Yoga for Mental Health to see how specific poses can rewire your stress response.
Anatomy of the Pose: What Muscles Does Warrior 2 Work?
To appreciate the true effectiveness of Warrior 2, we must look beneath the surface at the complex muscular engagement required to hold this shape.
It is a full-body integration that demands a balance of contraction and extension, making it a staple for anyone looking to improve their functional fitness.
Primary Muscle Groups Engaged
Warrior 2 is an isometric powerhouse, meaning your muscles are working hard to maintain a static position against gravity.
- The Lower Body (The Engine):
- Quadriceps and Hamstrings: The front leg undergoes intense eccentric and isometric loading to keep the thigh parallel to the floor.
- Gluteus Maximus and Medius: The glutes fire to stabilize the pelvis and keep the front knee from collapsing inward.
- Calves (Gastrocnemius and Soleus): Both calves work to ground the feet, providing the “root” of the pose.
- The Core (The Stabilizer):
- Obliques and Rectus Abdominis: Your core muscles must remain active to keep your spine tall and prevent the ribcage from splaying forward.
- Erector Spinae: These muscles along the back work to keep the torso upright and centered over the hips.
- The Upper Body (The Extension):
- Deltoids and Triceps: These muscles work to keep the arms lifted and energized.
- Trapezius and Rhomboids: These muscles in the upper back engage to pull the shoulder blades together and down, opening the chest.
Warrior 2 Yoga Functional Movement Benefits
For fitness enthusiasts and athletes, the anatomy of Warrior 2 offers benefits that carry over into everyday life and sports:
- Improved Joint Stability: By strengthening the muscles surrounding the hip, knee, and ankle joints, this pose helps prevent common injuries caused by instability.
- Increased Range of Motion: The active stretching of the inner thighs (adductors) and the back hip flexors improves overall hip mobility, which is essential for walking, running, and squatting.
- Postural Alignment: The emphasis on stacking the shoulders over the hips and lengthening the spine helps counteract the “forward-slump” posture common in sedentary lifestyles.
A Teacher’s Perspective
For yoga instructors, understanding this anatomy is key to providing safe cues.
Recognizing that the “burn” a student feels in their front thigh is the quadriceps working, while the stretch in the back leg is the psoas and adductors, allows for more precise instruction.
Emphasizing the “grounding” of the outer edge of the back foot ensures the posterior chain is fully engaged, protecting the lower back and creating a safer, stronger pose for all body types.
Warrior Pose 2 Modifications and Variations
Yoga is not a “one-size-fits-all” practice.
The true beauty of Virabhadrasana II lies in its versatility; it can be scaled down to support a healing body or amplified to challenge an advanced practitioner.
By adjusting the pose to suit your unique anatomy, you ensure that the practice remains sustainable, safe, and effective.
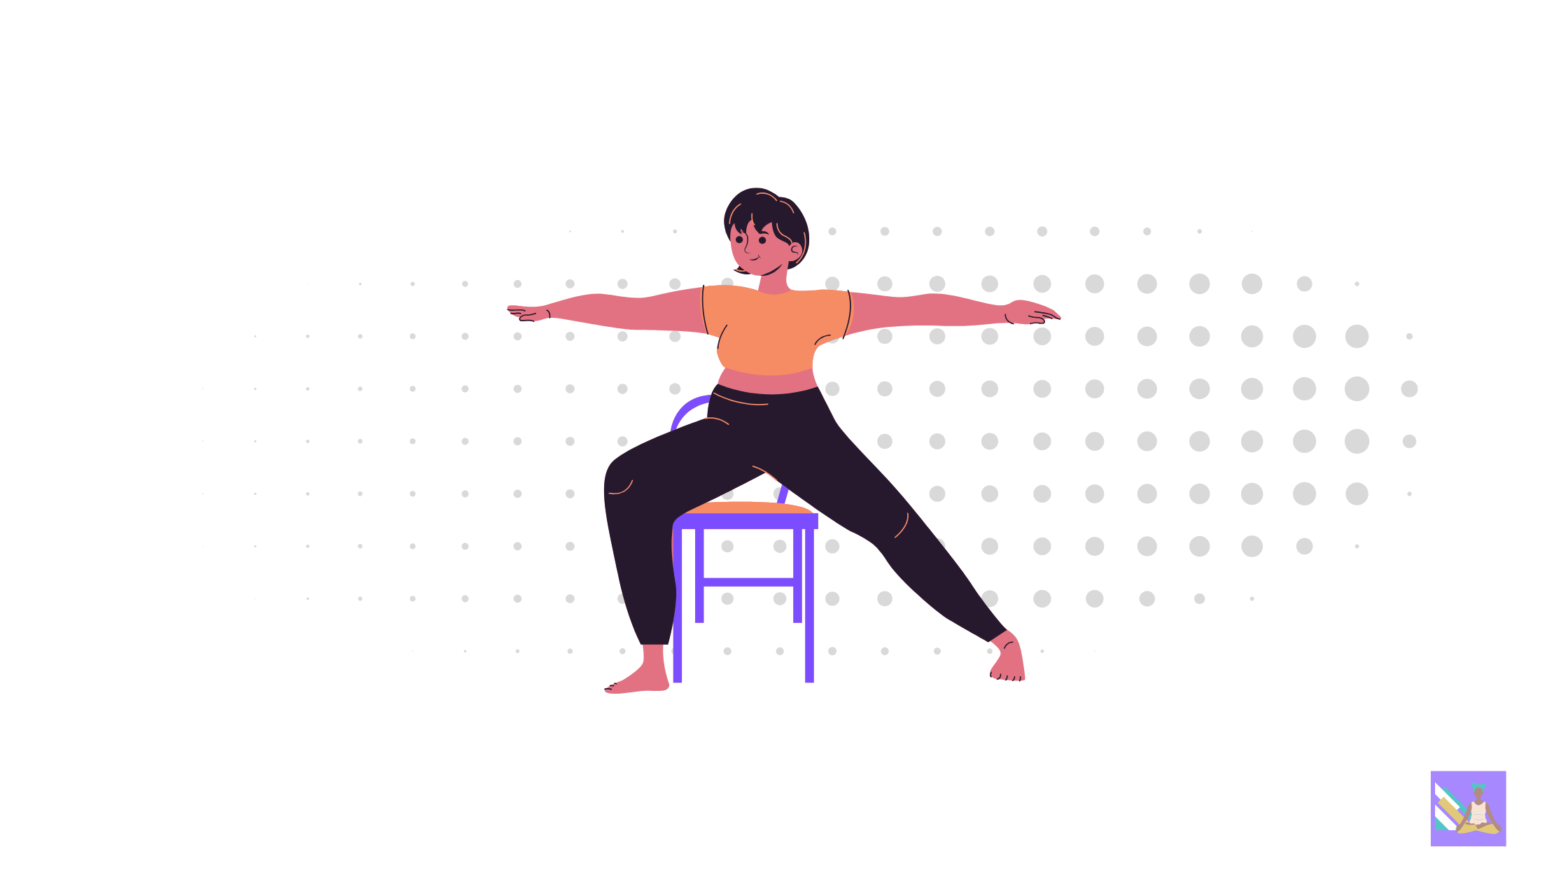
Warrior 2 For Beginners: Building Support and Stability
If you are still building the strength or balance required for the full expression of the pose, these modifications provide the necessary “scaffolding”:
- Using a Wall for Alignment: Stand with your back against a wall. As you move into the pose, allow your shoulder blades and the back of your head to lightly touch the wall. This provides immediate feedback on whether you are leaning too far forward.
- The Chair Variation: For those with limited mobility or balance concerns, sit on the edge of a sturdy chair with your legs in the Warrior 2 position. This allows you to experience the hip opening and arm extension without bearing full weight on the joints.
- A Narrower Stance: You don’t have to step four feet apart immediately. Shortening the distance between your feet makes it easier to maintain balance and reduces the intensity on the inner thighs.
Tips for Knee or Hip Issues
If you experience discomfort in your joints, small adjustments can make a world of difference:
- Protecting the Knee: If the front knee feels strained, ensure it isn’t “overshooting” the ankle. Keep it stacked directly above or even slightly behind the heel. Never let the knee cave inward; keep it tracking toward the middle toe.
- Easing Hip Tension: If your hips feel tight or “pinched,” turn your back toes slightly more forward rather than keeping them strictly at a 45-degree angle. This reduces the rotational pressure on the back hip socket.
- Micro-Bends: Never “lock out” your back knee. Keep a tiny, almost invisible micro-bend in the back leg to ensure the muscles are doing the work rather than the joint.
Warrior Pose 2 For Advanced Practitioners: Creating the Flow
Once you have mastered the foundational alignment, you can use Warrior 2 as a “home base” for dynamic movement:
- Transition to Reverse Warrior (Viparita Virabhadrasana): Keep your legs exactly as they are in Warrior 2. Reach your front arm up and back while resting your back hand lightly on your back leg. This adds a deep lateral stretch to the intercostal muscles.
- Flow to Extended Side Angle (Utthita Parsvakonasana): Lean forward and place your front forearm on your thigh (or a block), reaching your back arm over your ear to create one long line of energy from your back heel to your fingertips.
- Heel Lift: To increase the challenge for the calves and core stability, try lifting the front heel off the mat while maintaining the deep lunge.
Warrior Pose 2 in a Yoga Flow
Warrior 2 is often considered the “anchor” of a yoga sequence.
Because it builds heat while maintaining a neutral, side-facing orientation, it serves as a perfect transition point between standing poses and floor work.
Understanding how to weave it into a larger practice allows you to maintain a steady rhythm and a balanced distribution of energy.
How It Fits into Different Yoga Styles
The way you approach Virabhadrasana II often depends on the “flavor” of the class you are taking:
- Vinyasa Yoga: Here, Warrior 2 is usually a transitional powerhouse. You might move into it on an exhale from Warrior 1 or a High Lunge. The focus is on the fluidity of the “windmill” arms as you open the hips to the side.
- Hatha Yoga: In Hatha, the emphasis is on the hold. You may stay in the pose for 30 to 60 seconds, focusing on refining the alignment of the feet and the depth of the breath to build mental and physical endurance.
- Power Yoga: This style uses Warrior 2 to generate significant lower-body “fire.” Expect to pulse in and out of the lunge or use it as a base for high-intensity arm movements to elevate the heart rate.
Sample Yoga Sequence: The Warrior’s Path
To experience how Warrior 2 integrates with other postures, try this simple, balanced standing sequence:
- Downward-Facing Dog (Adho Mukha Svanasana): Start here to lengthen the spine.
- Three-Legged Dog: Lift the right leg high.
- Low Lunge: Step the right foot between the hands.
- Warrior 1: Pivot the back heel down and rise, hips facing forward.
- Warrior 2: Exhale as you open the hips and arms to the side, settling into the deep lunge.
- Reverse Warrior: Inhale, reaching the right arm back for a side-body stretch.
- Extended Side Angle: Exhale, bringing the right elbow to the thigh.
- Plank to Chaturanga: Windmill the hands down to the mat and flow back to Downward Dog.
When and How to Transition
Transitions are just as important as the poses themselves. They require core control to protect the joints during movement.
- Moving In: The most common entry is from Warrior 1 or High Lunge. On an exhale, you pivot the back heel down so the foot is parallel to the back of the mat while simultaneously sweeping the arms open.
- Moving Out: To exit, you can “windmill” the hands down to the floor to return to a lunge or Plank. Alternatively, you can straighten the front leg and pivot the toes forward to move into a Wide-Legged Forward Fold (Prasarita Padottanasana).
Pro Tip: Always lead the transition with your breath. Use your inhale to expand and lift, and your exhale to ground into the lunge or move into the next physical shape.
This keeps your movements controlled and prevents “dumping” weight into the knee joints.
Warrior 2 Pose Common Mistakes and How to Fix Them
Even for seasoned practitioners, warrior pose 2 is a posture that requires constant refinement.
Because it involves multiple planes of movement—balancing the front, back, and sides of the body—it is easy for the form to slip.
Identifying these warrior 2 alignment errors not only prevents injury but ensures you are engaging the correct muscle groups for maximum benefit.
1. Overextending the Front Knee
One of the most frequent warrior pose 2 mistakes is allowing the front knee to drift past the ankle toward the toes.
- The Risk: This puts excessive pressure on the patella and the connective tissues of the knee joint.
- The Fix: Look down; you should always be able to see your big toe on the inside of your knee. If the knee is too far forward, widen your stance or lift your hips slightly to stack the knee directly over the heel.
2. The “Lazy” Back Leg and Arm
It is common for the focus to remain entirely on the front of the body, causing the back arm to sag and the back foot to lose its grip.
- The Risk: This leads to an uneven distribution of weight, causing the front thigh to fatigue prematurely and the spine to lose its neutral alignment.
- The Fix: Imagine a line of energy pulling from your back fingertips just as strongly as the front. Press firmly into the outer edge of your back foot to engage the outer hip and lift the arch of the foot.
3. Leaning the Torso Forward
Many students subconsciously “reach” toward the front of the mat, tilting their torso over the lead leg.
- The Risk: This compresses the front hip crease and creates unnecessary tension in the lower back.
- The Fix: Imagine your spine is a central pillar. Ensure your shoulders are stacked directly over your hips. If you feel yourself leaning, place your hands on your hips and guide your torso back to the center until your weight is evenly distributed between both legs.
4. Collapsing the Front Knee Inward
Because of tight inner thighs (adductors), the front knee often “caves” toward the midline of the mat.
- The Risk: This creates a twisting strain on the knee and prevents the glutes from firing correctly.
- The Fix: Actively press your front knee toward the pinky-toe side of your foot. This external rotation opens the pelvis and creates a much more stable base.
Quick Alignment Checklist
| Body Part | What to Check |
| Feet | Is the front heel aligned with the back arch? |
| Knee | Is the knee tracking over the second toe, not the big toe? |
| Shoulders | Are they relaxed and stacked directly over the hips? |
| Gaze | Is your chin level and your focus over the front middle finger? |
By staying mindful of these subtle cues, you turn a simple standing pose into a powerful, balanced, and safe practice.
Who Should (and Shouldn’t) Practice Warrior 2?
Warrior 2 is a remarkably inclusive pose, but like any physical discipline, it requires a mindful approach.
While it offers a sturdy foundation for many, certain physical conditions may require significant modifications or a temporary pause from the practice to ensure long-term joint health.
Ideal For: Building Strength and Counteracting Daily Habits
- Beginners: Warrior 2 is one of the best “entry-level” standing poses. It introduces the fundamental concept of “stacking” joints (knee over ankle, shoulders over hips) and provides a clear, stable base to begin building endurance.
- Athletes: Runners, cyclists, and hikers often have strong but tight leg muscles. Warrior 2 helps by strengthening the stabilizer muscles around the hips and knees while providing an active stretch to the inner thighs and groin.
- Desk Workers: If you spend your day hunched over a keyboard, you likely suffer from “closed” hips and rounded shoulders. The expansive nature of Warrior 2 encourages chest opening and forces the hip flexors to lengthen, counteracting the effects of prolonged sitting.
- Seniors: When practiced with care (or using a chair/wall for support), this pose is excellent for maintaining bone density and improving functional balance, which is critical for fall prevention.
Caution For Warrior 2 Yoga: When to Modify or Skip
While warrior 2 is generally safe, those with the following conditions should proceed with caution:
- Acute Joint Injuries: If you have recent or chronic injuries to the knees, hips, or shoulders, the weight-bearing nature of this pose can cause flare-ups. Focus on a very shallow lunge or keep the hands at the hips to reduce the load.
- High Blood Pressure: Holding the arms out at shoulder height for long periods can sometimes increase heart rate and blood pressure. If you have cardiovascular concerns, keep your hands at your heart center (Anjali Mudra).
- Severe Balance Issues: Vertigo or inner-ear conditions can make the wide stance feel unstable. In these cases, practicing with your back against a wall or holding onto a sturdy piece of furniture is highly recommended.
- Neck Issues: If turning your head to look over your front hand causes pinching or pain, keep your head in a neutral position, facing the same direction as your chest.
The Importance of Professional Guidance
Everybody is unique. While self-practice is a wonderful way to connect with yourself, it is always wise to consult with a certified yoga instructor, especially when you are first learning.
A professional can provide personalized adjustments that account for your specific skeletal structure and any underlying health conditions.
Note: If you are recovering from surgery or have a significant medical condition, always consult your physician or physical therapist before beginning a new yoga regimen. Practice within your “edge”—the point where you feel a challenge but never pain.
Final Thoughts: Embrace Your Inner Warrior
Warrior 2 is more than just a physical pose; it is a lesson in resilience.
By practicing Virabhadrasana II, you cultivate a sense of calm strength that extends far beyond the yoga mat.
- Balance & Presence: The pose teaches you to stay grounded in the present while maintaining a clear focus on what lies ahead.
- Daily Integration: You don’t need a long session to see results. Just 30 seconds of Warrior 2 can reset your posture and sharpen your mental clarity during a busy day.
The goal isn’t a “perfect” alignment, but the steadiness you find within the effort. Carry this quiet confidence with you—breathe deeply, stand tall, and move with intention.